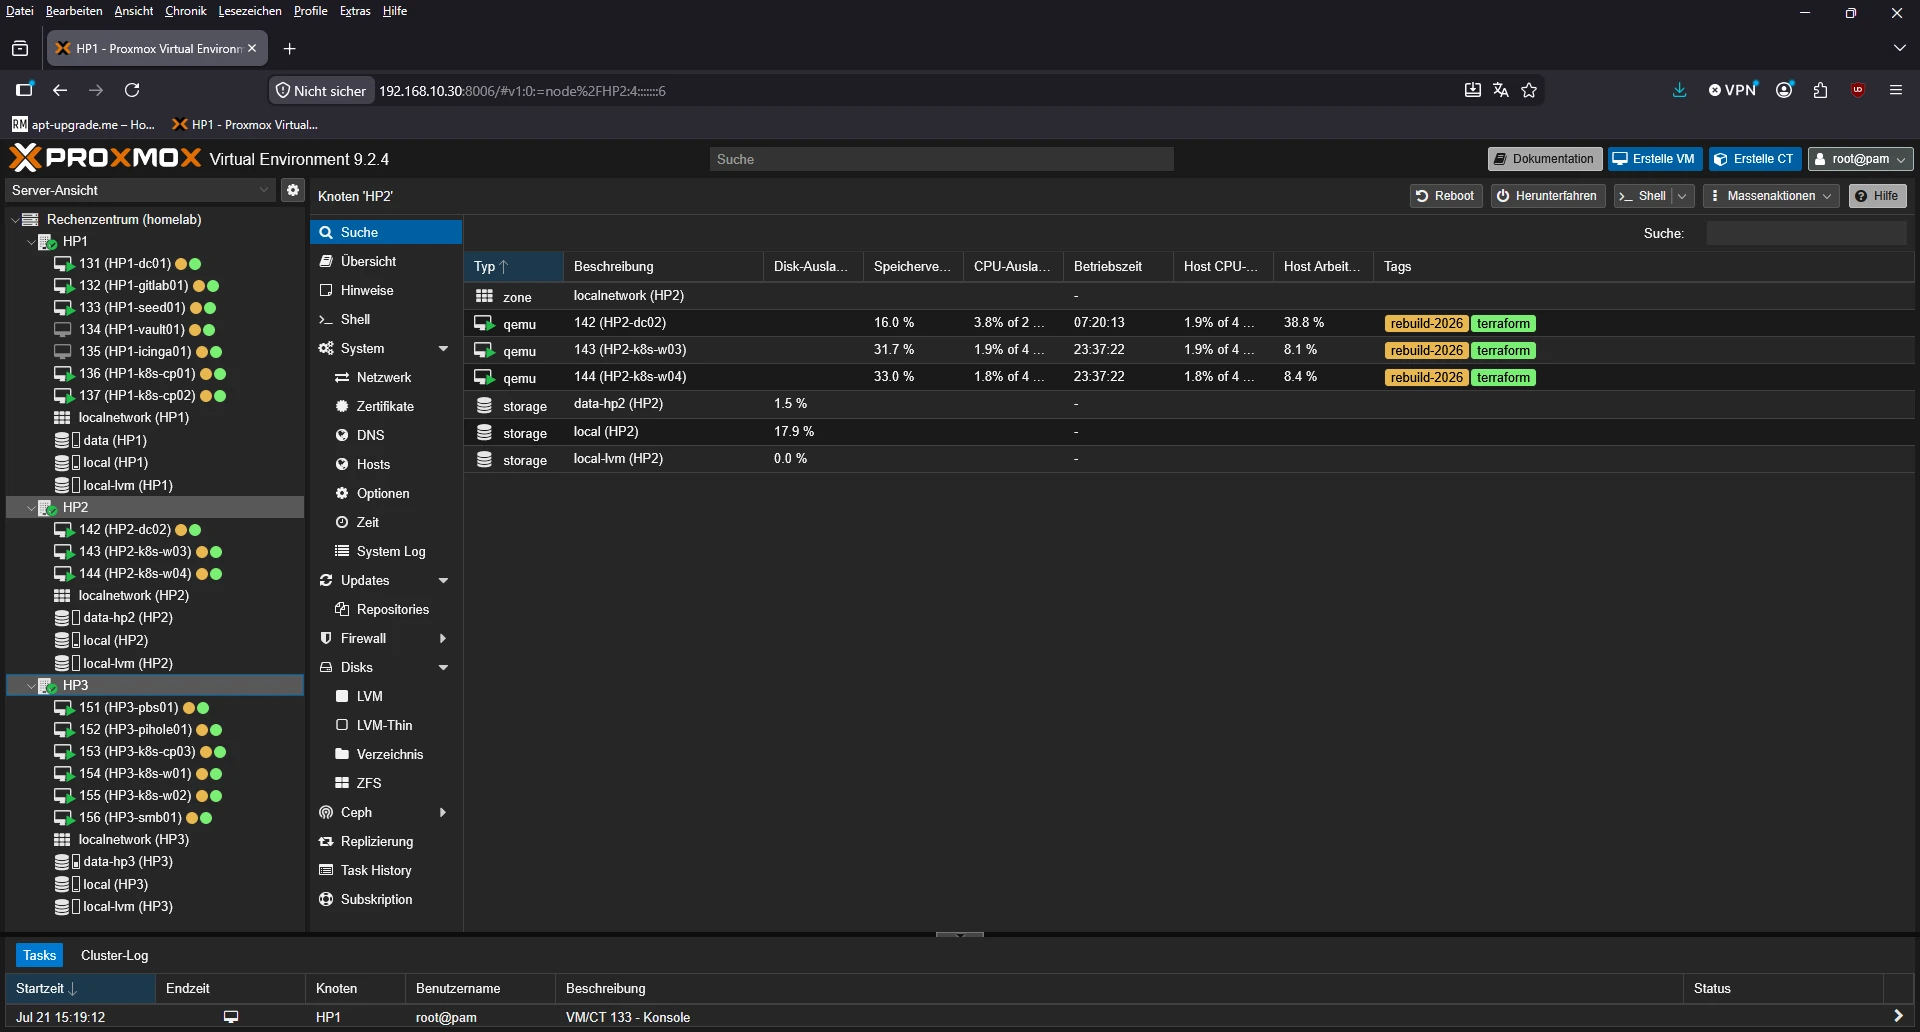

In the last post I laid out the plan for rebuilding my homelab as a small enterprise-style datacenter: five pillars, eight milestones, one blog post per milestone. Milestone 1 is the foundation everything else stands on — three physical boxes turned into a single Proxmox VE cluster, plus the Terraform module that provisions every VM on top of it from now on. This post covers both.
Fair warning: this whole project is very much a work in progress. Nothing here is “finished” or final — it’s beta at best, and it keeps changing as I go. Treat this post as a snapshot of where things stood when I wrote it, not a completed build.
🎯 Goal of this milestone
Two things had to be true before I could touch Active Directory, GitLab, or Kubernetes:
- Three separate HP machines had to become one Proxmox VE cluster, so VMs can be managed, migrated, and backed up from a single pane of glass.
- No VM should ever be clicked into existence again. Every VM — from the domain controller to the Kubernetes control plane — gets created by
terraform apply, not by a wizard in the Proxmox UI.
Everything below reflects the cluster as it actually runs today — I pulled the live values straight from the Proxmox API instead of relying on install-day notes.
🖥️ Hardware
Three HP machines, deliberately non-identical — this is recycled hardware, not a matched set:
| Host | RAM | Storage | Management IP |
|---|---|---|---|
| HP1 | 64 GB | 512 GB OS SSD + 2 TB SSD | 192.168.10.30 |
| HP2 | 32 GB | 512 GB OS SSD + 2 TB SSD | 192.168.10.40 |
| HP3 | 32 GB | 512 GB OS SSD + 3×2 TB (ZFS RAIDZ1) | 192.168.10.50 |
💽 Installing Proxmox VE
Nothing fancy on the install itself: Proxmox VE 9.2 ISO, written to a USB stick with Rufus, one stick per machine, boot, install, repeat three times. No remote virtual media, no PXE — for three boxes sitting on the same desk, a USB stick is still the fastest path from zero to a running hypervisor.
Each node got a static IP on the 192.168.10.0/24 management network during install (.30, .40, .50 for HP1–HP3), which doubles as the network the cluster and every VM lives on — more on that trade-off below.
One post-install step on all three: swap the package repos. Proxmox ships pointed at the Enterprise repository by default, which needs a paid subscription to actually pull updates from. Following Proxmox’s own documented steps, I disabled the Enterprise repo and pointed each node at the No-Subscription Repository instead — fine for testing/non-production use, which is exactly what a homelab is, just without the same validation the Enterprise repo gets:
# /etc/apt/sources.list.d/proxmox.sources
Types: deb
URIs: http://download.proxmox.com/debian/pve
Suites: trixie
Components: pve-no-subscription
Signed-By: /usr/share/keyrings/proxmox-archive-keyring.gpg
With that in place, the usual round on all three nodes before doing anything else:
apt-get update
apt-get upgrade
apt-get dist-upgrade
🌐 Networking
Each node has a single NIC bridged as vmbr0 (Linux bridge, STP off), which is what every VM’s network_device attaches to later on. A second onboard NIC port exists on the boards but sits unused for now — a candidate for a dedicated storage or corosync network later, but not something a 3-node homelab cluster needs on day one.
That’s also the one deliberate simplification worth calling out: corosync (the cluster’s heartbeat/quorum protocol) runs over the same network as management and VM traffic, using a single ring:
ring0_addr: HP1 = 192.168.10.30
ring0_addr: HP2 = 192.168.10.40
ring0_addr: HP3 = 192.168.10.50
In a production cluster you’d isolate corosync on its own VLAN or NICs so a saturated management network can’t cause spurious quorum loss. For three nodes on a home network with no other traffic competing for bandwidth, that risk is acceptable — it’s on the list of things to revisit if this ever grows past a homelab.
🔗 Forming the cluster
Standard pvecm flow: create the cluster on HP1, then join HP2 and HP3 to it. With three voting members the cluster tolerates exactly one node going offline (2 of 3 votes) before it loses quorum — the minimum viable HA setup, and the reason for going with three nodes instead of two in the first place. Querying the cluster today confirms the happy path held:
$ pvecm status
Cluster name:   homelab
Quorate:        Yes
Nodes:          3

Nodeid  Ip              Name
1       192.168.10.30   HP1 (local)
2       192.168.10.40   HP2
3       192.168.10.50   HP3
🗄️ Storage layout
This is where the three nodes stop being identical. Each node’s second disk (or disks, for HP3) is set up differently on purpose:
- HP1 & HP2: the extra 2 TB SSD is added as plain directory storage (
data/data-hp2) — no ZFS, no RAID, just a filesystem for VM disks, ISOs, and backups. Single SSD, nothing to mirror against, so the simplest option wins. - HP3: three 2 TB disks go into a ZFS pool run as RAIDZ1 (
data-hp3), giving just under 4 TB usable with one-disk fault tolerance. This is the node earmarked for anything I don’t want to lose to a single dead drive — think Longhorn replicas or MinIO data once Kubernetes lands.
Every node also keeps its default local (root filesystem) and local-lvm (LVM-thin on the OS SSD) storage from the installer, used for the OS itself and as overflow.
🧱 From ClickOps to Infrastructure as Code
With the cluster up, the tempting next step is to click “Create VM” seven times in the Proxmox UI. I did exactly that in the previous version of this homelab, and every VM ended up slightly different — a forgotten cloud-init setting here, a manually-typed static IP there, no record of what I’d actually done six months later. Not this time: every VM in this rebuild is defined once, in Terraform, and reproducible from a clean cluster.
⚙️ The Terraform module
The module lives in 01_terraform/ in the project repo and uses the bpg/proxmox provider. Rather than mounting an Ubuntu Server ISO and clicking through the installer, every VM is cloned from an Ubuntu 26.04 cloud image and configured entirely through cloud-init — static IP, DNS, SSH key, all of it — so there’s no interactive install step anywhere in the pipeline:
resource "proxmox_download_file" "ubuntu_cloud_image" {
  content_type = "iso"
  datastore_id = var.image_datastore_id
  node_name    = var.proxmox_node
  url          = var.ubuntu_cloud_image_url
  file_name    = "noble-server-cloudimg-amd64.img"
  overwrite    = false
}

resource "proxmox_virtual_environment_vm" "vm" {
  for_each = local.vms

  name        = each.key
  tags        = ["terraform", "rebuild-2026"]
  node_name   = var.proxmox_node
  vm_id       = each.value.vmid

  disk {
    datastore_id = var.vm_datastore_id
    file_id      = proxmox_download_file.ubuntu_cloud_image.id
    interface    = "scsi0"
    size         = each.value.disk_gb
  }

  initialization {
    ip_config {
      ipv4 {
        address = "${each.value.ip}/${var.network_prefix}"
        gateway = var.network_gateway
      }
    }
    user_account {
      username = var.vm_username
      keys     = var.ssh_public_keys
    }
  }
}
All seven VMs — one per role for this milestone — are declared as a single locals.vms map, so adding an eighth VM later is a five-line diff, not a copy-pasted resource block:
| Name | Role | IP | RAM | Disk |
|---|---|---|---|---|
| HP1-dc01 | AD / DNS / Root CA | 192.168.10.31 | 4 GB | 60 GB |
| HP1-gitlab01 | GitLab / Container Registry | 192.168.10.32 | 8 GB | 120 GB |
| HP1-seed01 | Dev VM (Ansible, kubectl, tooling) | 192.168.10.33 | 4 GB | 60 GB |
| HP1-vault01 | Secrets management (phase 2) | 192.168.10.34 | 2 GB | 40 GB |
| HP1-icinga01 | Monitoring | 192.168.10.35 | 4 GB | 60 GB |
| HP1-k8s-cp01 | RKE2 control plane | 192.168.10.36 | 8 GB | 80 GB |
| HP1-k8s-cp02 | RKE2 control plane | 192.168.10.37 | 8 GB | 80 GB |
VM IDs follow 100 + <last IP octet> (131–137) — Proxmox requires IDs ≥ 100, and this way the ID and the address stay easy to correlate at a glance, without a separate lookup table.
▶️ Rolling it out
The whole rollout is three commands once a Proxmox API token and an SSH key are in place:
cp terraform.tfvars.example terraform.tfvars
# edit terraform.tfvars: API URL, API token, node name, SSH key

terraform init
terraform plan
terraform apply
A couple of minutes later, all seven VMs exist, boot, and answer on their assigned IPs — and Terraform tells you exactly which is which:
Outputs:

vm_ids = {
  "HP1-dc01"     = 131
  "HP1-gitlab01" = 132
  "HP1-icinga01" = 135
  "HP1-k8s-cp01" = 136
  "HP1-k8s-cp02" = 137
  "HP1-seed01"   = 133
  "HP1-vault01"  = 134
}
vm_ips = {
  "HP1-dc01"     = "192.168.10.31"
  "HP1-gitlab01" = "192.168.10.32"
  ...
}
🧩 A few things worth flagging
- Cloud image, not ISO. The Ubuntu ISO sitting on HP1’s local storage is unused by this module on purpose — cloning a cloud image and configuring it via cloud-init is faster and fully unattended. The ISO stays around only for the rare manual install.
ignore_changeson the disk’sfile_id. Without it, Terraform wants to re-import the base image on every plan, since the downloaded file’s ID isn’t meant to be reconciled after the initial clone.- Secrets never leave the internal repo.
terraform.tfvarsholds the real API token and SSH key and is gitignored; a pre-push hook actively blocks it from ever reaching the public GitHub mirror of this project, on top of the gitignore. - State is local, and that’s fine. One operator, one laptop running
apply— a remote backend would be solving a problem I don’t have yet.
For a deeper technical walkthrough of the module — architecture, every variable, the full VM inventory, and a running list of lessons learned — see 01_terraform/docs/ in the repo (English, German, and French).
⚠️ This entire project — including the Terraform code shown below — is a permanent work in progress. It runs, it does what it says, but it’s still beta and gets reworked constantly. Don’t treat anything here as done or stable.
📊 The Windows ballooning blind spot
HP1-dc01 is provisioned by this module like every other VM, but it doesn’t stay Ubuntu for long — it gets converted to Windows Server right after, since that’s what Active Directory needs. The moment that happened, its RAM graph in the Proxmox summary flatlined at 100% of the assigned 4 GB, no matter how idle the VM actually was.
The cause: Proxmox doesn’t measure guest memory usage directly. It reads it back from QEMU’s virtual balloon device, which only reports real numbers if a driver is running inside the guest to feed it. On the Linux VMs in this cluster, that comes bundled with qemu-guest-agent — already covered in the guest-agent fix above. Windows Server has no equivalent built in, so without extra software the balloon device has nothing to report, and Proxmox just shows the VM pinned at its full allocation.
The fix was a second virtual CD-ROM: mounting the virtio-win driver ISO and installing the VirtIO Balloon Driver from it through Device Manager. That’s the same driver package that also carries the Windows equivalent of the guest agent — once it was installed, the summary graph started tracking actual memory pressure instead of a flat line at the ceiling. More on turning this VM into an actual domain controller in the next post.
🔜 What’s next
With a quorate 3-node cluster and a repeatable way to spin up VMs, milestone 2 starts turning HP1-dc01 into an actual domain controller: Active Directory, DNS, and the offline Root CA that everything else in this homelab will eventually trust. That’s the next post.